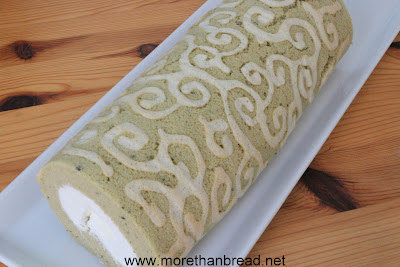
這個圖案是我從Junko的書上跟著做的,看似很難,但其實又很容易,真是想每個圖案及設計都去試試!
Ingredients for a 10x10 inch pan
4 egg whites
3 egg yolks
65g sugar
50ml water
40ml vegetable oil
1/2 tsp pure vanilla extract
80g cake flour
1 tsp cornstarch
2 tsp matcha powder, dissolved in 20 ml hot water
150g heavy whipping cream
15g sugar
1) Place a parchment paper bigger than the size of the baking pan. Preheat oven to 340°F.
2) Use a handheld mixer, whisk 3 egg yolks with 35g of the sugar until pale, about 3 mins.
3) Add water, oil and vanilla extract, mix well.
4) Add the sifted cake flour and beat until the batter is thick.
5) Put 1 tsp of this batter into a small dish. Add ½ tsp cornstarch into the dish and mix well. Mix the matcha mixture to the rest of the batter.
6) Beat one egg white until stiff peaks form. Add ½ tsp cornstarch and mix well. Mix it with the yolk mixture in the small dish and put in a piping bag. Draw with this batter onto the parchment paper.
7) Bake for 90 seconds and take out to cool.
7) Bake for 90 seconds and take out to cool.
8) Beat the remaining 3 egg whites until soft peaks form. Add the remaining 30g sugar and beat to stiff peaks.
9) Fold to the matcha egg batter until blended.
10) Pour onto the pan and smooth out the surface. Tap the pan a few times to release the big bubbles.
11) Bake for 14 mins until a toothpick inserted comes out clean.
12) Take out the pan and cover the top with a new piece of parchment.
13) Invert the cake, with the parchment paper, onto a cooling rack.
14) Peel off the now top parchment paper but let it cover the cake until cool, about 15 mins.
15) While the cake is cooling, whip the heavy cream with sugar until stiff peaks form.
16) Remove the top parchment paper and replace with a new one. Invert the cake and peel off the paper.
17) Spread the whipped cream on top evenly and roll up the cake.
18) Refrigerate at least an hour before cutting.
17) Spread the whipped cream on top evenly and roll up the cake.
18) Refrigerate at least an hour before cutting.
 |
| it makes a nice gift !用透明紙包好變成精美禮物! |
此份量可用於一個10x10寸大的焗盤
4隻 蛋白
3隻 蛋黃
65g 糖
50ml 水
40ml 液體菜油
半茶匙 雲呢哪香油
80g 低筋麵粉,過篩
一茶匙 玉米粉
二茶匙 日本抹茶粉,用二湯匙熱水溶解
二茶匙 日本抹茶粉,用二湯匙熱水溶解
150ml 奶油
14g 糖
1) 焗盤上放焗爐紙,預熱焗爐至340°F。
2) 將三個蛋黄加35g糖打約三分鐘至奶白色,加水、油及雲呢哪香油,攪勻。
3) 加80g低筋粉繼績打至蛋漿變濃稠。
4) 預備一個小碗,將一茶匙蛋漿放入碗內,加半茶匙玉米粉,攪勻。將抹茶溶液加入其餘蛋漿。
5) 將一個蛋白打至硬身,加入半茶匙玉米粉,再與小碗內之蛋漿混合,放入唧袋,然後在爐盤上劃圖案,放入焗爐焗約九十秒。
6) 蛋白三個打至白色後加入餘下 30g 糖打至硬身,與抹茶蛋漿拌勻,倒入焗盤,輕敲盤讓大氣泡消氣。
7) 焗十四分鐘或至牙籤插入後抽出沒有蛋漿便成。
8) 取出焗盤,放一張新焗爐紙在上面,將整個蛋糕反轉,將低紙撕去,再蓋回蛋糕上待涼十五分鐘。
9) 奶油加糖打至硬身備用。
10) 蛋糕涼後換上一張新焗爐紙,再反轉蛋糕,讓蛋糕面再反回上面,圖案在底,撕去焗爐紙,平均地塗上已打發奶油,再輕手慢慢將蛋糕卷起。
11) 放雪柜至少一小時後便可切片享用。


Hi Phoebe, Wow it is so pretty.It is an art .
ReplyDeletePat
Thanks Pat. I am still a beginner in terms of art works.
ReplyDeletei like the gift tag!
ReplyDelete