
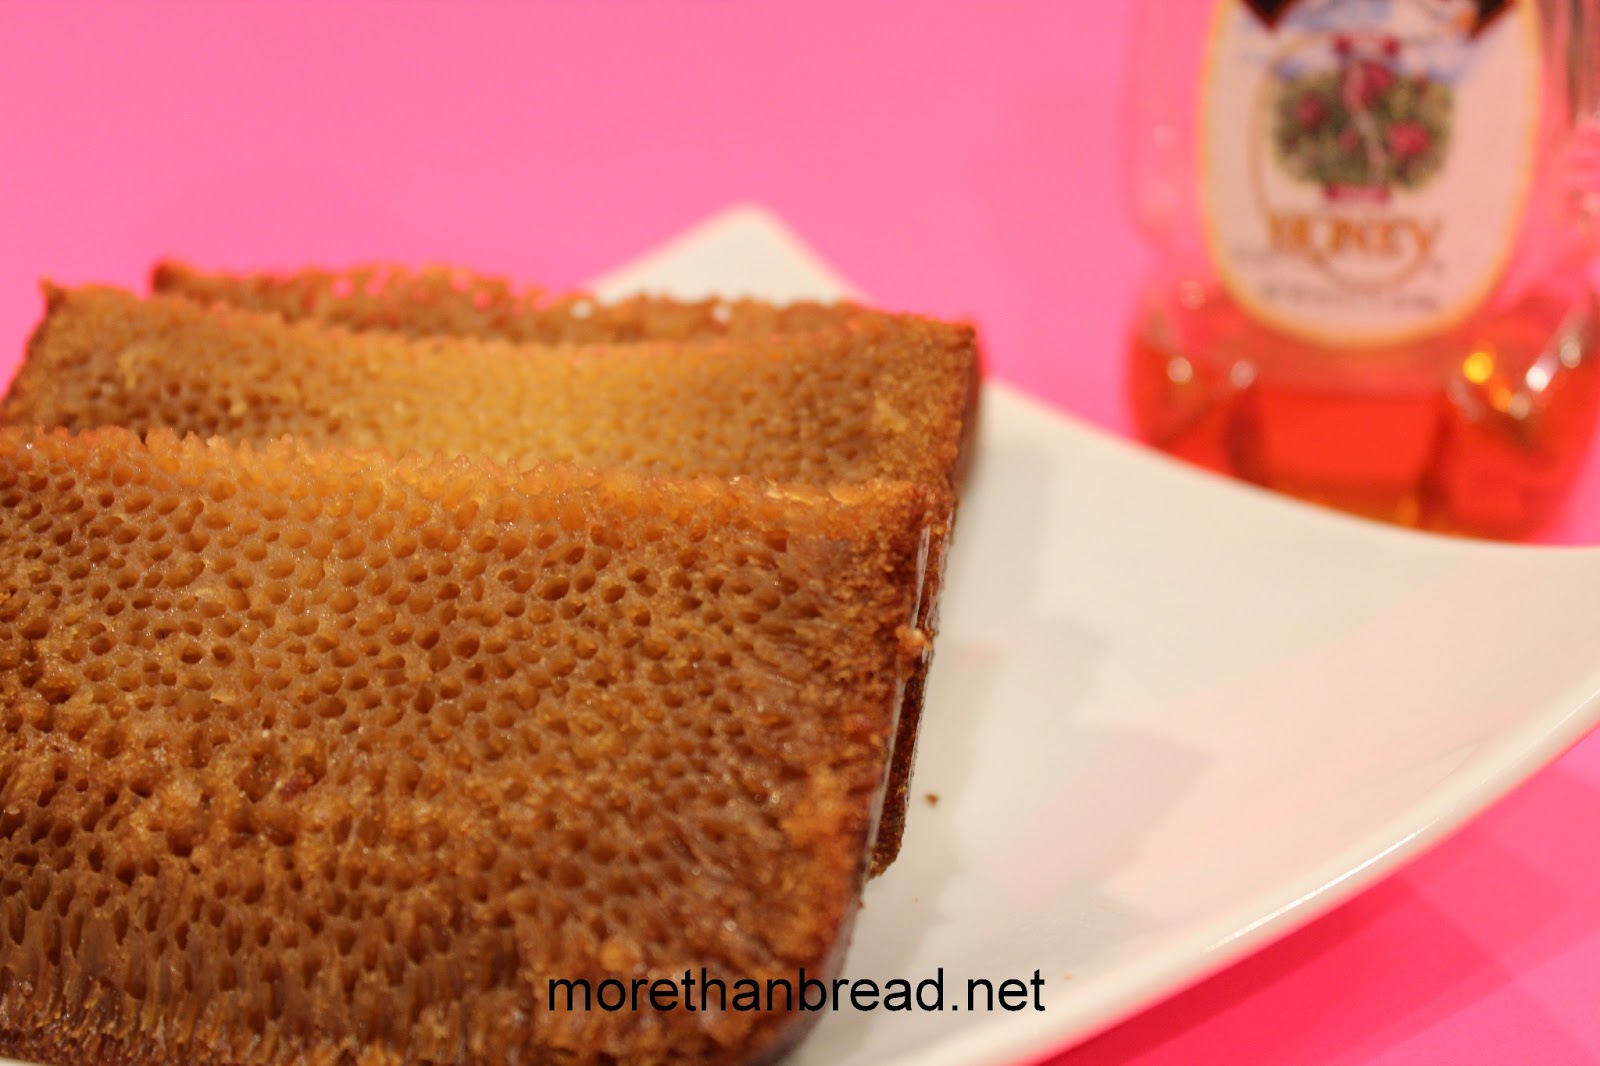
Do you believe looks are deceiving? I believe that we all have an experience of getting fooled by an object's appearance. Sometimes an unattractive look may hide something that is the opposite. It is so true to this cake. I did not find it very appealing at first sight, but as I cut across it and took a look, I was surprise to find the gem inside--a honeycomb-like appearance. The little holes are perfectly aligned to mimic the look of a honeycomb (just mimic, because a honeycomb is made up of hexagons, not circles).
The production of this cake is unconventional--no creaming of butter and sugar and no vigorous beating of egg whites to form peaks and it will not rise high like a chiffon cake. The holes are formed by the chemical reaction between baking soda and the egg batter. Voila! The magic of science! Besides the creation of air bubbles, the addition of baking soda causes the browning of the cake, which is not from the caramelized sugar.
This is a very simple and straightforward cake. The recipe does not even require a electric hand-held mixer, so it's a good opportunity to spend time making it with your children during the summer, exposing them to the wonders of science in cooking!
俗語有話說:人不可貌相。其實蛋糕也不可單看外貌。早幾日在茶樓飲茶,見到一款完全被人忽視的小點,它的外表平平無奇,沒有任何裝飾或吸引人注意的色彩,但內裏有排列精緻細密的氣孔,就仿如蜂巢一般,口感有點煙韌,頗為特別。
回家仔細研究及搜尋後,發覺這蛋糕的做法與一般有別,它不是靠打發蛋白去令它鬆起,也不是用乳化牛油及糖的做法,而是利用梳打粉與蛋醬的化學作用而產生的氣泡,以致蛋糕內有無數的細孔,真是奇妙無窮! 而它的棕褐色也不是添加的,主要也是由於梳打粉在焗爐加熱後的作用,不是由焦糖引起的。
這款蛋糕做法容易、簡單,連電動攪拌器也不須要,最適合在悠長暑假與小朋友一起做,又好玩、又好食、又可以寓娛樂於教育,讓他們上一課科學實驗堂也不錯!
食譜參考: 君之
Ingredients to make a 9x5 loaf pan:
2 large eggs 雞蛋
160g condensed milk 煉奶
100g vegetable oil 植物油
10g honey 蜜糖
100g sugar 糖
180g water 水
100g cake flour 低筋粉
5g baking soda 梳打粉

1) Put sugar and water in a small pot and let it boil into a syrup. Remove from heat after boiling and let it cool down to room temperature.
2) Use a hand whisk to beat up the eggs. Add condensed milk and stir well. Add honey and mix until blended.
3) Add vegetable oil and mix until it forms a smooth batter.
4) Sift together the flour and baking soda and add to the batter. Mix well.

5) Pour the cooled syrup to the batter in 3 additions. Mix well before adding each addition. Cover with a wrap and let it sit in room temperature for 45 minutes. Preheat the oven to 395 F after 30 minutes. Lay a parchment paper on the pan.

 |
| tiny holes developed visually in the batter after 45 minutes of resting |
6) Pour in the batter and bake in the preheated oven for 30-35 minutes until the cake is completely brown. Let the cake cool in the pan on a rack and remove after it is cooled. Cut the cake horizontally to display the honeycomb.
Notes:
1) It is essential to rest 45 minutes before baking for the chemical reaction to take place.
2) The cake must be cut horizontally to reveal the holes.
先將糖及水煲滾成糖水,待冷備用。蛋打散,加入煉奶,攪勻,再加蜜糖,攪勻。加油再拌勻,篩入低筋粉及梳打粉,攪勻。糖水分三次倒入蛋醬,每次都要拌勻才加入下一次。蓋上保鮮紙,靜待四十五分鐘。過了三十分鐘便預熱焗爐至395度。焗盤鋪焗爐紙,倒入蛋醬,焗30-35分鐘,或至蛋糕成深棕褐色,取出放架上完全冷後,便可打橫切開,再切厚塊享用。
注意事項:
1) 蛋醬混合好之後一定要等四十五分鐘,讓氣泡有足夠時間形成,之後才可以入焗爐。
2) 因為氣泡是往上升的,所以要打橫切才可以見到它們的精密。
Hi Phoebe, It is just like steam rice cake (Pak Tong Go).I defintely try it this weekend when I have guests to taste it with me .
ReplyDeleteMei from Boston
Hi Mei,
DeleteCompare with pak tong go, they have more disparity than similarity. It is dark brown, not white; it is baked, not steamed; it takes only 45 minutes waiting time, not 6-7 hours of fermentation; it uses baking soda, not yeast; it tastes sweet, not sour or tangy. The only thing they share is the holes....the holes in this cake are more prettier ^_^